Sweet Inspiration and Culinary Adventures!

Thursday, March 22, 2012

The Wonders of Cookbooks


It’s true.  Cookbooks are wonderful, inspirational learning tools.  They are also beautiful.  I wanted to make one of my New Year's Resolutions to make one new dish a month.  It's definitely possible, but I never actually pledged to do this.  So now, I’m setting a goal to cook one new dish a month, choosing from a cookbook I already own, or one that someone lends to me (hello library!).  It will be challenging, but an exceptional learning opportunity.  Perhaps the creative juices will really start to flow and I'll do it more than once a month!

To start, I’m choosing a recipe from Better Homes and Gardens Grill It!  Secrets to Delicious Flame-Kissed Food.


Tequila-Marinated Chicken Thighs
Prep: 15 Minutes
Marinate: 4 Hours or Overnight
Grill: 50 Minutes
Makes: 6 Servings


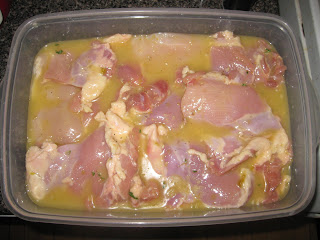
12 Chicken thighs, skinned
1/2 cup orange juice
1/4 cup tequila
2 tablespoons lime juice
1 tablespoon finely chopped canned chipotle pepper in adobo sauce (I substituted for salsa verde)
1 teaspoon snipped fresh oregano
2 cloves garlic, minced
1/2 teaspoon salt
1/4 teaspoon pepper


Place chicken in a large resealable plastic bag, or a container.  For marinade, in a small bowl stir together orange juice, tequila, lime juice, chipotle pepper, oregano, garlic, salt and black pepper. Pour over chicken and seal bag or container.Turn to coat chicken.  Marinate in the refrigerate for 4 hours or overnight.


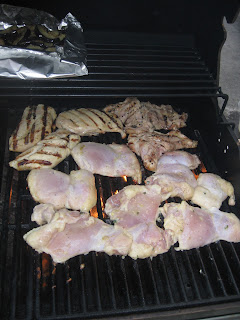
Drain chicken, reserving marinade.  For a charcoal grill, arrange medium-hot coals around a drip pan.  Test for medium heat above pan.  Place chicken, meaty sides down, on grill rack over pan.  Cover and grill for 50 to 60 minutes or until chicken is no longer pink, turning and brushing once with reserved marinade halfway through grilling.  For a gas grill, preheat grill.  Reduce heat to medium.  Adjust for indirect cooking.  Place chicken on grill rack over the burner that is off and grill as directed.  (I used a gas grill and grilled directly over the flame until chicken was cooked through.  This allowed for a much shorter cooking time.)


The chicken was delicious.  It had a crispy crunch on the outside, but still tender on the inside.  Delicious!  

Sunday, March 18, 2012

Happy St. Patrick's Day!


St. Patrick's Day is celebrated very differently in the United States than in Ireland.  Here, we celebrate the Irish holiday by waking up early to enjoy green eggs and beer with friends; "Kegs and Eggs" for breakfast, please!  Followed by a day of parades, dying the river green and bar after bar of green people.  Put your green on and let the celebration begin!


I wanted to make something "Irish" for St. Patrick's Day this year.  The early morning breakfast food is already provided (thank you to my hosts!), so the bacon, Cheddar, chive scones I was thinking won't do.  On to my specialty, dessert.  I thought about Guinness cupcakes, but have done them so many times I wanted to experiment with something slightly different this year.  I'll stick with the simple vanilla cupcake, but dress it up for St. Patrick's Day by making a Baileys buttercream frosting instead of my traditional vanilla.  Unfortunately (or fortunately), these cupcakes are only for those 21 and older.  This really isn't a traditional Irish dish, like a Full Irish Breakfast or Bangers and Mash, but it will definitely hit the spot.


Lá Fhéile Pádraig Sona Duit 

Baileys Buttercream Frosting
2 pounds (1 bag) confectioner's sugar
2 sticks unsalted butter (I prefer European style, like Kerrygold)
1 teaspoon vanilla
6 tablespoons Baileys
Milk, as needed for consistency


Cream butter.  Add confectioner's sugar in stages and  beat on low speed.  Add all other ingredients.  Beat until smooth.  

Thursday, March 15, 2012

Salted Caramel? Yes, please!


Celebrating another birthday, my specialty.  I wanted to do something unique and fun.  I decided to branch out and try a new recipe – Salted Caramel Chocolate Cupcakes.  Whoa.  – Happy Birthday, L!

As usual, I started with massive amounts of research.  I never try a recipe unless I trust the source, it received rave reviews or just looks too good to pass up.  For this recipe, the one I found looked way too good to pass up and I was right!

This was my first attempt at homemade caramel.  It was interesting to make – and involved a candy thermometer, something I had never used before.  Very straightforward though, heat the sugar, water and corn syrup.  After the heating process is over you add the heavy cream.  I was very surprised at what happened next, maybe even a little shocked.  Adding the cream to the heated mixture creates a boiling, hissing effect, very strange if you’ve never experienced it before!  I thought for a few seconds I had ruined my batch of caramel.  Wrong, turned out perfectly.  I was stunned at how easy it was and how delicious it turned out.  I think I’ll be adding caramel to more of my baked goods in the future.  Yum. 
After scooping out the middle of each cupcake, I filled them with the caramel.  The caramel sinks in, so I went around a second time and added more.  I still had leftover caramel.  May as well take this cupcake over the top and make a salted caramel buttercream to top off each cupcake.

Moist chocolate cupcakes with a  center filled with salted caramel, topped with a salted caramel buttercream.  Seriously.  These cupcakes were better than I could have imagined.  The perfect birthday treat.


Chocolate Cupcakes
Adapted from Martha Stewart

  • 1 1/2 cups all-purpose flour
  • 3/ cup unsweetened Dutch-process cocoa powder
  • 1 1/2 cups sugar
  • 1 1/2 teaspoons baking soda
  • 3/4 teaspoon baking powder
  • 3/4 teaspoon salt
  • 2 large eggs
  • 3/4 cup buttermilk
  • 3 tablespoons vegetable oil
  • 1 teaspoon pure vanilla extract
  • 3/4 cup warm water
  • Salted Caramel Filling, recipe below
Preheat oven to 350 degree F.  Line muffin tin with paper liners.  Whisk together flour, cocoa, sugar, baking soda, baking powder and salt.  With mixer on low speed, add eggs, buttermilk, oil, extract and the water; beat until smooth and combined.

Spoon the batter into liners about two-thirds full.  Bake approximately 15-17 minutes, or until tester comes out clean.  transfer tins to wire racks and allow to cool for 10 minutes; turn cupcakes onto racks and let cool completely.  Cupcakes can be stored overnight at room temperature, or frozen up to 1 month in air tight containers.

Use a pairing knife to cut a cone-shaped piece (about 1/2 inch deep) from the center of each cupcake and throw away the pieces.  Make the salted caramel.

Salted Caramel
  • 2 1/2 cups sugar
  • 2/3 cup water
  • 1 tablespoon light corn syrup
  • 3/4 cup heavy whipping cream
  • 1 1/2 teaspoons flaked sea salt (or coarse sea salt)
Heat sugar with the water and corn syrup in a heavy saucepan over medium-high heat, stirring occasionally, until syrup is clear; clip a candy thermometer to side of pan and stop stirring.

Cook until syrup comes to a boil, washing down the sides of a pan with a wet pastry brush as needed.  Boil, gently swirling pan occasionally, until mixture is caramelized and just reaches 360 degrees F.  Remove from heat and slowly pour in cream; stir with a wooden spoon until smooth.  Stir in sea salt.

Let cool for about 15 minutes; if caramel begins to harden reheat gently until it reaches a pouring consistency.  Spoon 1 to 2 teaspoons warm caramel into each hollowed-out cupcake.  The caramel will slightly sink into the cupcake - just add more.  Sprinkle a pinch of sea salt over filling.

Use the leftover caramel for the frosting.

Salted Caramel Buttercream Frosting
  • 2 sticks unsalted butter *European style
  • 1/2 teaspoon flaked sea salt
  • 1 teaspoon vanilla extract
  • 4+ cups powdered sugar
  • 1/2 cup leftover caramel sauce from above
Caramel should now be cool enough to use for the frosting.  Make sure it's slightly warm to the touch and still able to be poured.  If it's hardened too much, gently reheat until able to pour.

In a mixer fitted with paddle attachment, beat butter and salt together until lightened and fluffy.  Reduce speed to low; add powdered sugar and vanilla.  Mix until thoroughly combined.

Scrape down the side of the bowl and add the caramel.  Beat on medium-high speed for a few minutes until light and airy, and completely mixed.  If the frosting looks like it needs to set, refrigerate for 15 minutes.  The caramel wavers between too warm or too thick if it is too cool.  This will affect the frosting.  If you need stiffer frosting, add more confectioner's sugar.

Use a pastry bag with a medium star tip and pipe frosting onto each cupcake.  Garnish each cupcake with a pinch of sea salt.  

Store at room temperature.  Makes approximately 21 cupcakes.

Sweets for my Sweet


I asked J what he wanted for dessert for Valentine’s Day – his response, brownies, with peanut butter and coconut.  I thought yum, peanut butter brownies.  I can do this.  Coconut, seriously?  I’m not the world’s biggest coconut fan.  The taste and smell I love!  It’s a texture thing - sprinkling the coconut shreds into batter, no thank you, but add a dash to a cocktail, sold!  But what he wants, I’m delighted to make as long as he leaves with a smile!  So I did a bit of compromising.  I scoured the Internet for a beloved recipe that would fit the bill for our very special dinner.  Where better to go than one of my favorite blogs Brown Eyed Baker.
She modified her brownie recipe from Baked: New Frontiers in BakingDescription: http://www.assoc-amazon.com/e/ir?t=broeyebak-20&l=as2&o=1&a=1584797215; and the peanut butter swirl adapted from Martha Stewart.  I just added a dash of coconut! 

I made the batter according to the recipe and poured it in a 9x 13 pan.  I then followed the directions for the peanut butter swirl.  Wow.  I couldn’t help but sneak a taste, this is really going to up the ante on these brownies.  After swirling in the peanut butter, I added shredded coconut to ¼ of the pan – I sprinkled a handful of shreds onto the batter and mixed it in with a knife. 

The brownies were fudgy with a peanut butter finish – so delicious.  J’s reaction was precisely what I hoped for.  He said they were perfect and exactly what he wanted.  Happy thoughts.

Peanut Butter Brownies with or without Coconut

Yield: 24 brownies
Prep Time: 35 minutes  Bake Time: 30 minutes

Brownies:
1 ¼ cups all-purpose flour
1 teaspoon salt
2 tablespoons dark, unsweetened cocoa powder
11 ounces dark chocolate, coarsely chopped
1 cup (8 ounces) Unsalted Kerrygold Butter, cut into 1-inch pieces
1 ½ cups granulated sugar
½ cup packed light brown sugar
5 eggs, at room temperature
2 teaspoons vanilla extract
Peanut Butter Swirl:
½ cup Kerrygold Unsalted Butter, melted
1 cup powdered sugar
1 ½ cups creamy peanut butter
½ teaspoon salt
1 teaspoon vanilla extract
  1. Preheat the oven to 350 degrees F.  Butter the sides and bottom of a 9x13 inch glass dish. 
  2.  In a medium bowl, whisk the flour, salt and cocoa powder together.
  3. Melt the chocolate and butter, stirring occasionally, until the chocolate and butter are completely melted and smooth.  Add the sugars.  Whisk until completely combined.
  4. Add 3 eggs to the chocolate and whisk until combined.  Add the remaining eggs and whisk until combined.  Add the vanilla and stir until combined.  Do not overbeat the batter, or your brownies will become cakey.
  5. Using a spatula, fold the flour mixture into the chocolate until just a bit of the flour is visible.
  6. Pour the batter into the prepared pan and smooth the top.
  7.  In a medium bowl whisk together the peanut butter swirl ingredients.  Using a spoon, place dollops of the peanut butter swirl over the top of the brownie batter.  Using a butter knife, swirl the chocolate and peanut butter together.
  8. Bake for 30 minutes, rotating the pan halfway through the baking time, until a cake tester (or toothpick) inserted into the center comes out with a few crumbs.  Let the brownies cool completely.